•••Search Patterns by Subject/collection••
Release Form to Make Pattern Copies
New To Intarsia
Getting Started with Intarsia
Great Intarsia & Scroll Saw Tips
Find Answers on the FAQ's
Patterns with Detailed Photos
Check out our FREE Patterns
•Featured Patterns & Products


#I-719 “My Heart’s Love” - REMEMBERANCE PATTERN
$10.95
Beginner/Intermediate Level 10" high by 11 1/2" wide 11 pieces. Woods Used: Red Heart was used for the heart...

#LP-1 Baby Giraffe
$10.95
Intermediate/Advanced Level 13" x 9 3/4" 65 pieces. "Baby Giraffe" is the First Release in the "Lost Patterns" Series....

#LP-10 BABY PUFFINS
$10.95
Beginner/Intermediate Level 13" x 10 1/4"" 121 pieces "Baby Puffins" is the Tenth...

#LP-2 Sasquatch
$10.95
Intermediate Level 11" x 10 1/2" 78 pieces. "Sasquatch" is the Second Release in the "Lost Patterns" Series. This pattern...

#LP-3 Azure Tit
$10.95
Beginner/Intermediate Level 8" x 10 1/4"" 73 pieces + 4 pieces for...

#LP-4 1957 Bel Air
$10.95
Intermediate/Advanced Level (small details) 16 1/4" x 7 1/4" 139 pieces "1957 Bel Air" is the Fourth Release in our "Lost...

#LP-5 FLAKEY THE SNOWMAN
$10.95
Beginner/Intermediate Level 10" x 9 1/2" 33 pieces "Flakey the...

#LP-6 SNOWMAN AND CARDINAL
$10.95
Beginner/Intermediate Level 11" x 9 1/2" 23 pieces "Snowman and...

#LP-7 ROSE TRINKET BOX
$10.95
Beginner/Intermediate Level 3 3/8" diameter, 16-piece rose, box height shown is 1 1/2", but could be height of choice ...

#LP-8 ROSE BUD
$10.95
Beginner Level 7 1/2" x 4 1/4", 14 pieces "Rose Bud" is the Eighth Release in...

#LP-9 Turkey Point Lighthouse
$10.95
Intermediate/Advanced Level (small details) 12 1/2" x 10 1/2" 203 pieces plus frame "Turkey Point Lighthouse" is the Ninth Release in...

++CT-23 Triggerfish
$22.45
Beginner Level 8 3/4" x 13 1/2" 16 pieces. CT "Classroom in a Tube" comes with 24 pages of detailed...

++CTP-23 Triggerfish
$10.95
Beginner Level 8 3/4" x 13 1/2" 16 pieces. This was the project for our 2017 - 2022 Beginner Classes....
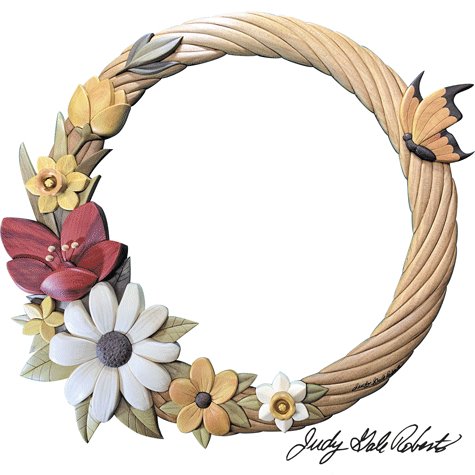
+I-424 First Bloom Wreath
$10.95
Beginner/Intermediate Level 14 1/2" wide x 13 1/2" high, 116 piecesFirst Bloom Wreath has the same flowers as II-29 First...
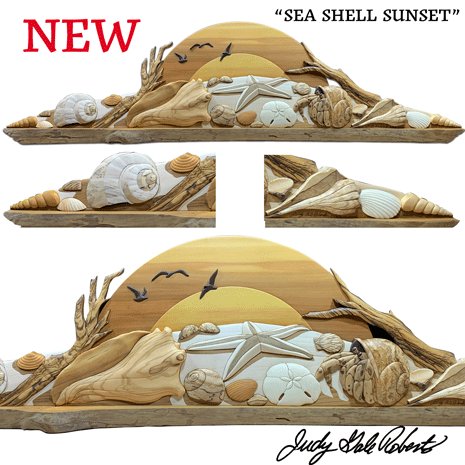
+II-28 Sea Shell Sunset
$11.95
Intermediate Level Two Width Options; 33 3/8"wide x 8 1/4" high (149 pieces), 22"wide x 8 1/4" high (105 pieces)This Pattern can ship outside the US.A...
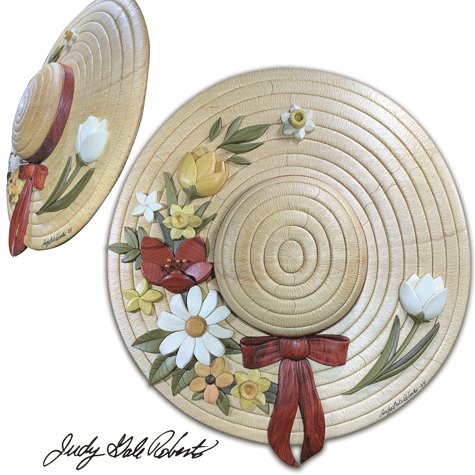
+II-29 First Bloom Hat
$10.95
Intermediate Level 14"wide x 15 1/4" high 166 pieces.First Bloom Hat is a sun hat with lots of flowers, daffodils,...

+Wonder Wheel $42.95: ...Bushing Needed - Reduces 1" Down to Motor Shaft Size $3.00
$3.00
The Wonder wheel works best on a bench grinder that goes at least 3450 rpm SELECT THE BUSHING ABOVE. Reducer Telescope...
Assorted Sample Pack
$14.95
If you are new to scrolling you may have questions about which blade will cut a wood species most efficiently...
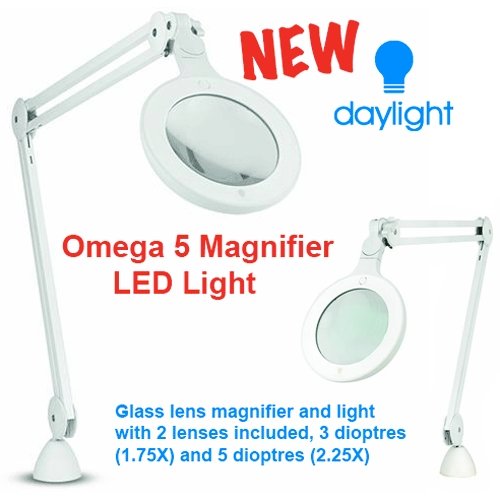
Daylight Omega 5 Magnifying LED Lamp
$299.99 $359.99
A Great Buy at $50.00 Off the Suggested Retail Price!MSRP $359.99This ergonomically designed Daylight™ Omega-5 professional-quality magnifying lamp features high-power,...
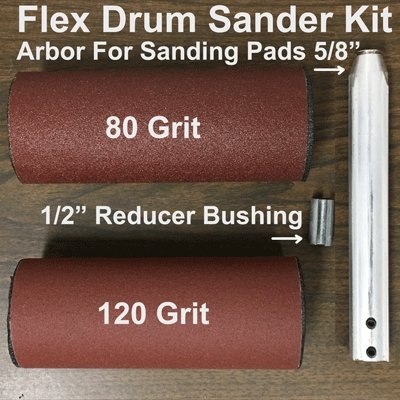
Flex Drum Sander+
$42.95
This soft drum sander will help you attain the soft contours on your Intarsia projects. This specially designed unit clamps to...

I-05 Seascape
$10.95
Beginner/Intermediate Level 21? x 15½? 57 pieces. Seascape Intarsia Pattern. Beach scene with a variety of shells, driftwood, and...
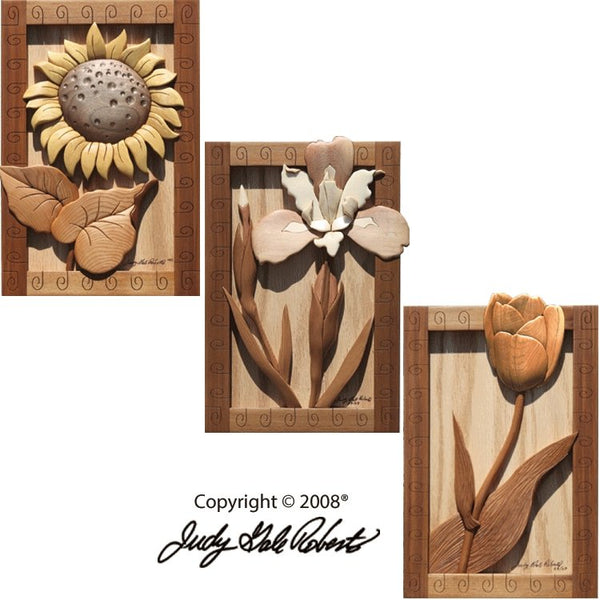
I-266 Flower Fest #1
$10.95
Beginner/Intermediate Level 11 ½” x 7 ½” Sunflower 33 pcs, Tulip 19 pcs, Iris 36 pcs.Individually framed flowers. A Wonder Wheel was used for adding...
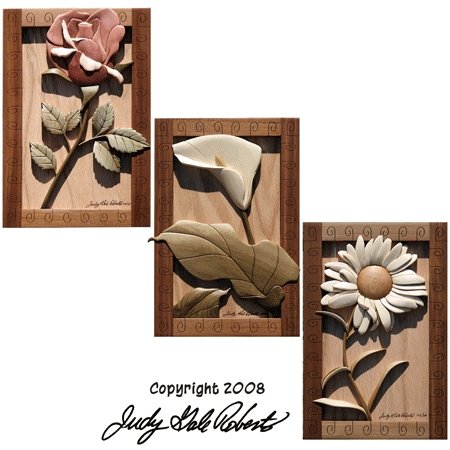
I-267 Flower Fest #2
$10.95
Beginner/Intermediate Level 11 ½” x 7 ½”. Rose 41 pcs, Calla Lilly 28 pcs, Daisy 51 pcsIndividually framed flowers. A Wonder Wheel was used for adding texture. Woods Used: Various...
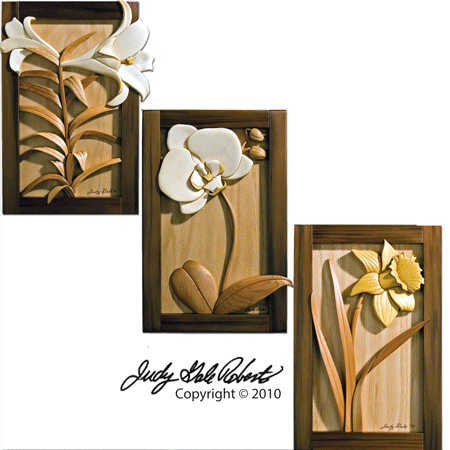
I-281 Flower Fest #4
$10.95
Beginner Intermediate Level 11 ½” x 7 ½” Daffodil 18 pieces, Easter Lily 44 pieces, Orchid 32 pieces. The frame and...
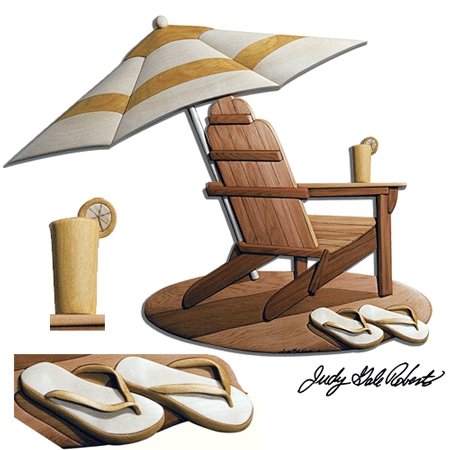
I-292 Summer Daze
$10.95
Intermediate Level 21” x 18” 84 pieces. Kick off your flip flops and relax under a large...

I-313 Watermelon & Pears
$10.95
Beginner/Intermediate Level Watermelon 10 x 8½” 51 pieces Pears 10” x 8½” 33 pieces. Fruit Series: Watermelon & Pear with checkerboard frame....

I-330 George & Alice
$10.95
Intermediate Level 21½” x 15” 48 pieces. Two Cardinal birds sitting on a fence. There is a lizard hidden in...
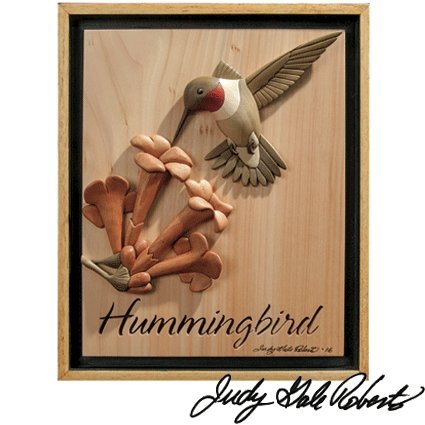
I-378 Humming Bird
$10.95
Beginner/Intermediate Level 8? x 10? 40 pieces. Ruby throated hummingbird with trumpet flowers. This is an updated pattern that...
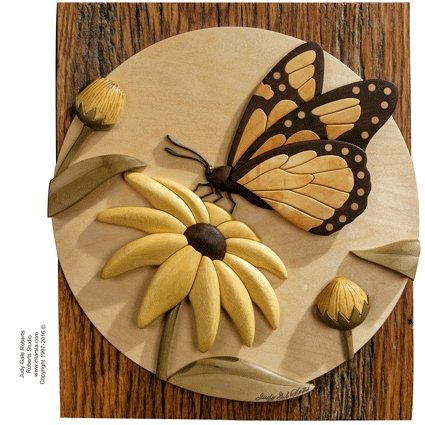
I-382 Butterfly
$10.95
Beginner/Intermediate Level 10? x 10? 44 pieces.This is an updated pattern that was originally printed in “Artistry in Wood”...
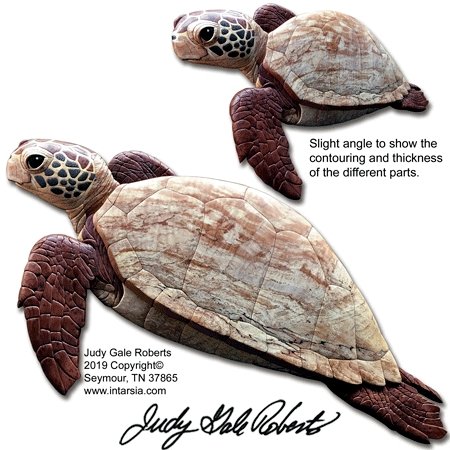
I-395 Sea Turtle
$10.95
Intermediate - Advanced Level 26 1/2? x 14 1/2? 187 total piecesWoods Used: 7/8" thick Spalted Maple for most of the...
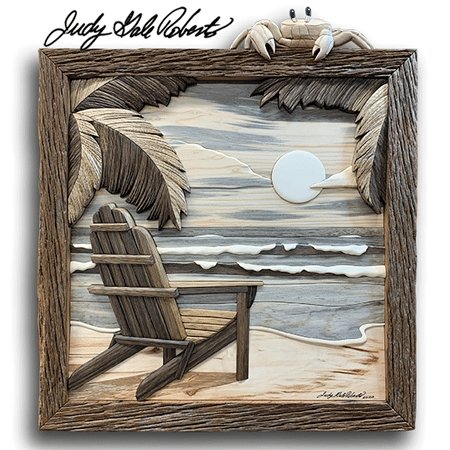
I-396 Seaside Serenity
$10.95
Intermediate Level 16? wide x 16 1/4" high 78 piecesAdirondack chair on the beach framed with palm trees. A fun ghost...

I-415 Owl Glasses
$10.95
Beginner/Intermediate Level 4? x 5½? 18 pieces. 3D Intarsia funny face Owl that can hold your eye glasses, the owl makes a great...

I-419 Baby Sloth
$10.95
Beginner/Intermediate Level 13 3/4" wide x 12" high 64 pieces Baby (brown throated) Sloth in a frame with an optional branch. The...

I-421 Blue Crab
$10.95
Beginner/Intermediate Level 12.25? wide x 10.5" high, 81 piecesBlue Crab ready for the beach. "Down by the sea pattern". Woods Used: I used 7/8" thick...

I-422 3D ClownFish
$10.95
Beginner/Intermediate Level 6.25? wide x 5" high, 28 pieces"Bubbles" the little 3D Clownfish ready to swim to your heart. "Down by...

II-27 Wren & Morning Glories
$11.95
Advanced Level Three Height Options 8" wide x 46 7/8" (101 pieces), 22 1/2" (53 pieces), 16 1/4" (37 pieces) This Pattern can...
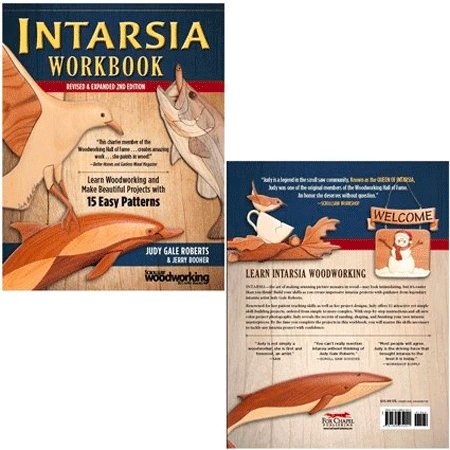
Intarsia Workbook by Judy Gale Roberts
$15.95
Intarsia Workbook Revised & Expanded 2nd Edition Intarsia may look intimidating, but it’s easier than you think. Build your skills as you...